Exemplo adaptado

Setting up Windows XP to map files with an ssh tunnel

In order to really map a drive remotely you need to do some setup work first. Here is a simple description.

Network Setup

These instructions assume Windows XP, other versions of Windows may look or behave differently. You will almost certainly need to be logged in as an Administrator or a user with Administrator privelage to perform the early setup steps.

Go to Start-menu/Setting/Network connections

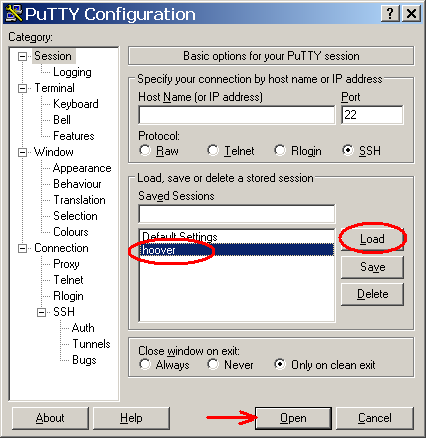
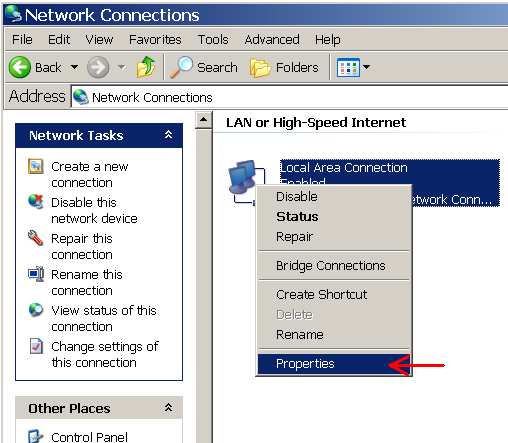
Open network properties (ideally of the network connection in use):
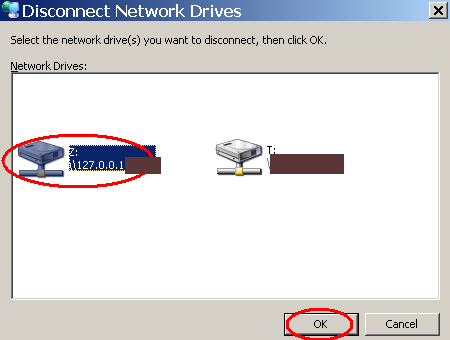
get properties
 
Select File and printer Sharing ..., and click uninstall

Confirm removal.

network properties
 
The properties window should now not show that software at all. network properties2
 
If you are using dial-up networking then the properties windows look a little different and you want the Networking pane not the General one. dialup properties
 
Ensure that NetBIOS over tcp/ip is enabled, select Internet Protocol (TCP/IP), click Properties, then click on Advanced.

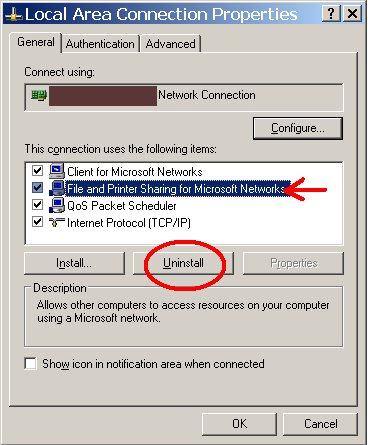
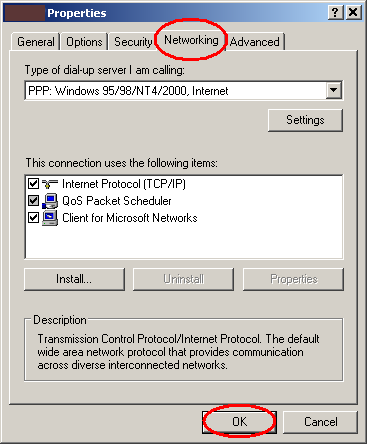
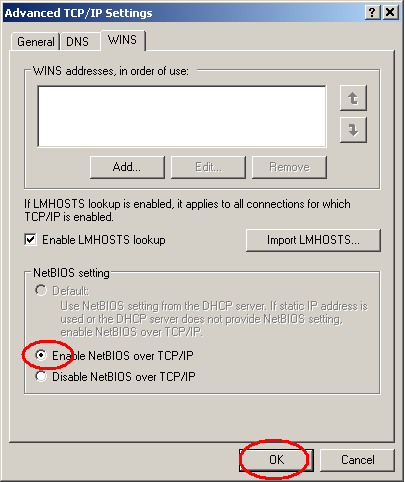
Select the Wins pane and ensure that Enable NetBIOS over TCP/IP is checked.

Without this things may still work, but might not!

The (common) default value of this setting of this sets NetBIOS over TCP/IP to be on or off depending on information provided by your ISP servers (their DHCP server for in particular).

So it might work one day and not the next.

enable netbt

Putty Setup

Now we need to set up and configure Putty

Select to the Tunnels section on the left hand frame. In the right hand frame enter parameters for adding a new forwarded port
    ensure that Local is checked
    Source port: 139
    Destination: smb.alunos.di.uminho.pt:139

then hit the Add button.

putty
tunnel
 
It should show the new tunnel information in the Forwarded ports section.

Select Session at the top of the left hand frame.

putty
tunnel2
 
Enter the Host name, ensure that SSH is checked.

Enter a session name into the Saved Sessions box and click on Save. It should now show up in the list of sessions below.

To launch the session hit Open.

putty session
 
After creating a suitable session as above you can later just select the session, hit Load and Open to avoid having to enter the parameters each time.

Or you can run putty/plink on the command line with options like:

  plink -ssh -2 -L \
      139:smb.alunos.di.uminho.pt:139 \
      aXXXXX@ssh.alunos.di.uminho.pt
or just load up a saved session by specifying it on the command-line.
load session
 

Map the drive etc

To graphically map the drive, go to the explorer menu: and find Tools/Map Network Drive...

Enter in the folder box: \\127.0.0.1\aXXXXX

Ensure that Reconnect at login is unchecked, click on the connect using a different user name

map
drive
 
Enter the User name as: aXXXXX

enter your password, click Ok.

connect as
 
You should see a message about Attempting to connect... while it makes the connection to the file-server.

Assuming it all works you should see an explorer window something like:

exploring
 
or of course you could map the drive by running:
  net use z: \\127.0.0.1\aXXXXX /USER:aXXXXX *

from a command line/batch script (if z: is the drive letter to map).

 
To disconnect graphically go to the explorer menu: Tools/Disconnect Network Drive... select the drive to disconnect and clock on Ok.

or you can right click on the drive in the explorer window and select Disconnect.

or from a command line:

  net use z: /delete

if z: was the drive mapped above.

unmap

If you have problems with these instructions please contact...